
Do you want to remove scribbles from a screenshot on an iPhone? Well, we’ve got you covered.
You may find you made scribbles on an image, and it now looks unprofessional, or unreadable.
We will explain a few different ways you can remove them.
Let’s get right into this!
Table of Contents
1. Use Photo Retouch to remove the scribbles
The first way to remove scribbles from a screenshot is by using Photo Retouch.
Photo Retouch is a great free photo editing app and allows you to remove things from images, like scribbles.
So, download the app, and open it up. You will need to allow Photo Retouch to access your photos.
Select the screenshot you would like to remove the scribbles from
Then, you can choose the image you want to edit.
You will be able to view your photos.
Remove the scribbles from the screenshot
Once you have selected the image, you need to tap on “Object Removal” in the bottom left of the app.

You will see that there are a few different selection tools.
These tools are “Brush” and “Lasso”.

With the “Brush”, you can brush over what you want to remove from the image.
Also, you can change the size of the brush as well.
But, with the “Lasso”, you draw around the object or thing that you want to be removed from the image.
So, choose the tool you want to use, and select the object or scribbles you want to remove.
Once you have selected the scribbles, the area will be highlighted, and there will be a “Go” button on the right-hand side of your screen.

Next, you need to tap on “Go”.
Now, 9 different effects will load.
By default, “Default” will be selected. We tend to use this option, but feel free to try out the other effects to see what you think looks best.
After you have chosen the effect you want to use, you need to tap on the tick icon in the bottom right of your screen.

You will then be taken back to the editing screen.
In order to save the screenshot with the scribbles removed, you need to tap on the “Export” button in the top right of the screen.
It looks like a square with an arrow pointing out of the top right of it.

Then, you just need to tap on the “Save” button and the image will be saved to your Photos app.
You can then do whatever you would like with the image.
2. Use Canva to hide scribbles
The second way you can remove and hide scribbles on a screenshot is by using Canva, which is on the Apple App Store.
Canva is another great graphic design and photo editing app.
So, first of all, you need to download the app and open it up.
When you first open the app, you may need to give access to Canva to access your photos.
Find the screenshot you want to remove scribbles from
From the Canva home page, you need to tap on the camera icon in the top right of the app, in the search bar.

This will open up a menu with a few options.
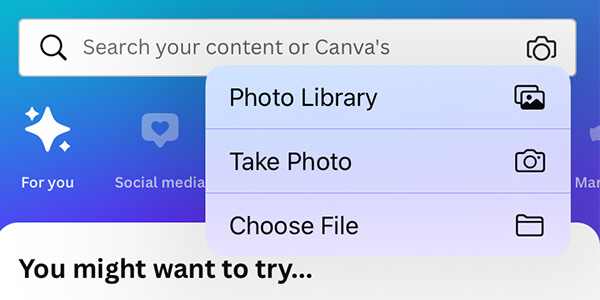
You need to tap on “Photo Library”.
Then, you need to select the image you want to remove the scribbles from.
Canva will ask you to select the dimensions for the image. We just left them as they were.
Now, you will be able to edit the screenshot!
Place a shape to hide and remove the scribbles
So, tap on the plus button in the bottom right of Canva.

This will bring up a menu where you can add graphics and many other things to the image.
In order to hide and remove the scribbles, you can add an element. So, tap on “Elements”.

Then, you can select a shape that you would like to use.
Once you have selected a shape, it will be added to your image and you can change the size of it to make it fit over the scribbles.
You can add other elements and graphics as well if you would like!
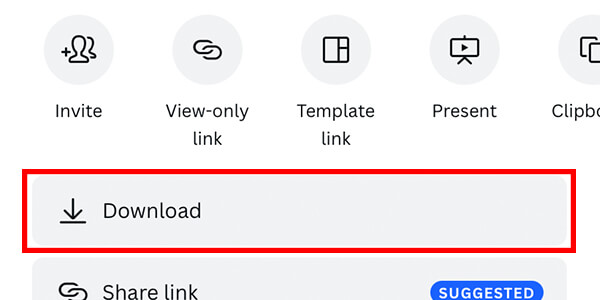
In order to save the image to your Photos app, you can screenshot it and then crop it, or you can tap on the “Save” button, which looks like a square with an arrow going upwards.

Then, tap on “Download”.
You can choose the file type, and customize a few of the other settings.
There is another “Download” button at the bottom of the screen you can tap to save it to your Photos app. After a moment, a menu will slide up.
You need to tap on “Save Image” to save it to your camera roll.
3. Take another screenshot
Another way to remove scribbles from a screenshot is by taking another screenshot.
This is the fastest way to remove them.
In order to take another screenshot, you will need to go back to the website or app that the screenshot was taken on.
Then, press the increase volume button and the power button at the same time.
However, depending on what the screenshot was of, it may not be possible to recreate it.
So, you may need to try another method!
Also, the screenshot may have been sent by someone else.
In this case, you may need to ask the sender to take another screenshot without the scribbles.
If the scribbles are hiding something personal, they may not want to.
But, if there is a genuine reason why you want the image without the screenshots, they may send it to you!
Or, you can ask for them to be more precise with the scribbles to make it look less messy.
4. Crop the screenshot to remove scribbles
A further way you can remove scribbles from the screenshot is by cropping the image.
In order to crop a screenshot on an iPhone, you need to open up the Photos app and find the image you want to crop.
Next, you need to tap on “Edit” in the top right of your screen.

This will give you a few tools you can use to edit the image.
Right at the bottom of the screen, there are a few options, you need to tap on the “Crop” button.
The button looks a bit like a square.

This method works if you don’t want to include the part of the image where the scribbles are.
Then, you can select the area of the image you want to keep by moving the grid around.
Once you are happy with the area you are cropping, you need to tap on “Done” in the bottom right of the screen.
This will save your changes and you can use the image for whatever you would like!
Final words
We hope you found this useful!
Rob’s social media:
Read more about GuideRealm and our editorial guidelines.