
In this guide, I break down exactly how to use gimp and create a full GIMP tutorial for beginners. I have also created a video on this as well which can be watched at the bottom.
Table of Contents
What is GIMP?
GIMP is a free and open-source raster graphics editor used for image manipulation and image editing, free-form drawing, transcoding between different image file formats, and more specialized tasks.
1. Download & install GIMP.
Go to gimp.org/downloads/ which is the official GIMP website. Go to the top bar on the website and click on ‘Download GIMP Directly’ and you will be taken to the download page.
Once you have downloaded GIMP then go ahead and install it normally and follow the installer instructions.
2. Setting up GIMP correctly.
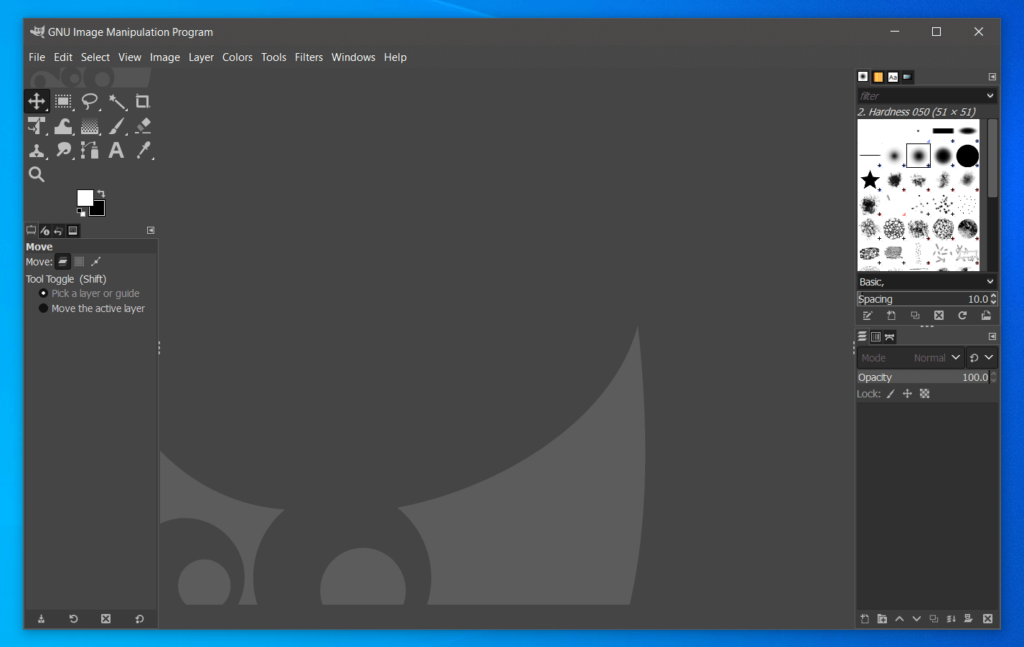
Before we show you how to use gimp, we need to make sure you have all the tools and windows setup correctly. Make sure it looks our example screenshot just below this.
The main windows which should be on your screen (From left to right) are:
- Toolbox
- GNU Image Manipulation Program
- Layers – Brushes
If it doesn’t, then locate the main GIMP window labelled ‘GNU Image Manipulation Program’ and on the bar of options, click on ‘Tools’ and then there is a list of tools you can choose to add.
3. Creating a new project.
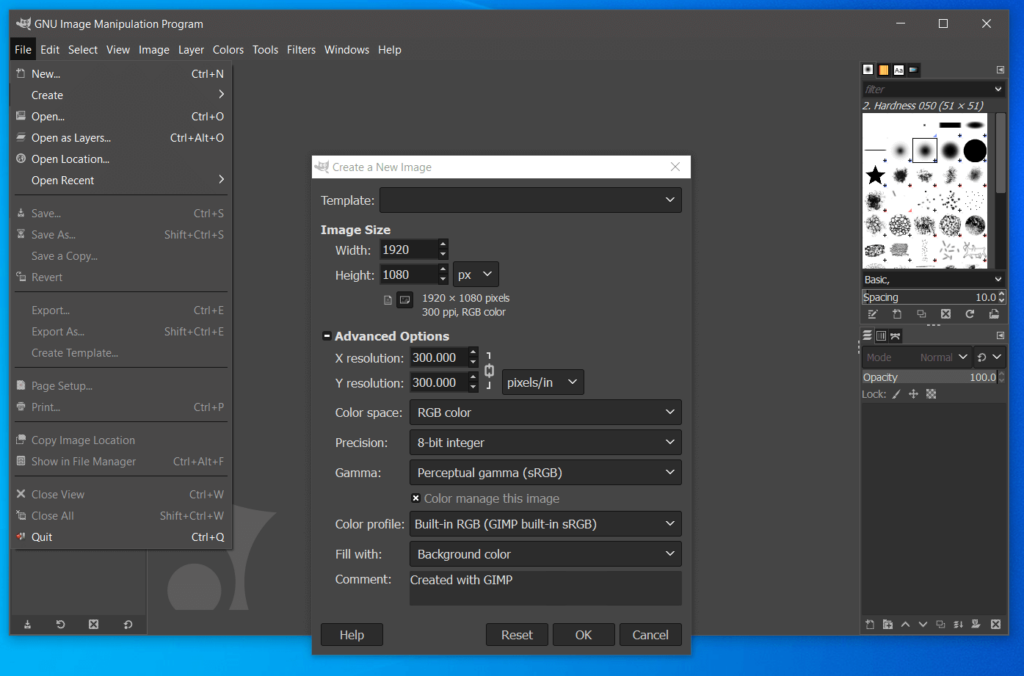
Go to ‘GNU Image Manipulation Program’ window and select ‘File’ and then ‘New..’ and then you can choose your image size. The image size is fully up to you and will depend on the purpose of the image as well. We will use: Width: 1920 & Height: 1080
Then click on ‘Advanced Options’ and there are a few more options. The main setting to consider is ‘Fill width’ if you’re working with PNG and transparent images, then make sure to select transparency. Otherwise it does not matter which background you choose as you can change the color later on.
Now go and click ‘Ok’ and you will have created your project.
4. Changing background color.
To change the background color, you need to go over to the ‘Toolbox’ and then go to below the tools. Here you will see a colored or white rectangle, simply click on it and a color pallet will appear.
Select the color you would like as your background and click ‘Ok’
Go to the ‘Toolbox’ once again and make sure the bucket is selected (It should be by default). Move over the canvas with your mouse and left click. The background should then change to the color you selected.

5. Creating new layers
Before doing anything else, it’s best to create a new layer for each change we make as then it’s easier to remove if we change our minds about it.
To do this, come over to the ‘Layers’ window and in the middle of it, there is a small white file option, click on this and you’ll get a ‘New Layer’ pop up.
The default options are fine so click ‘Ok’.
6. Adding text.
Select the text tool in the ‘Toolbox’ which has the image of an ‘A’.
Come over to the canvas and simply drag to create a text box. Once you’re happy with the size, come back over to the ‘Toolbox’ and click on go down to the bottom half with the title ‘Text’. Here you can change the color of the text by click on it. You should change it as it likely will be the same color as the background, so it won’t be seen.
You can also change the size of the text and font as well, either in the ‘Toolbox’ of the in the text box as well.
The lines around the text will disappear once another layer is selected.
To move the text, simply click on the move tool in the ‘Toolbox’ which looks like a cross with arrows on each side. Then drag the text to what position you would like.

7. Adding shapes.
There are two different types of shapes we can add, rectangle and ellipse. These can be adjusted to be squares or circles as well.
Go to the ‘Toolbox’ and click on one of them.
Now you back to your canvas and drag and hold your mouse till you get the shape you would like. If you release too early, then move your mouse around the shape and yellow squares will appear, you can use these to adjust the shape.
It should now having a moving line around the shape you drew.
You now what to fill it, so come over to the ‘Toolbox’ and click on the bucket tool. Below the tools, locate the rectangle with a color in it and click on it to bring up the color pallet. Choose the color you would like to fill your shape with. Once you’re ready, bring the bucket tool inside the shape and click within the shape.
To stop the lines around the shape, go to the top bar in ‘GNU Image Manipulation Program’ and click ‘Select’ and then ‘None. This should stop it.

8. Saving & exporting your image.
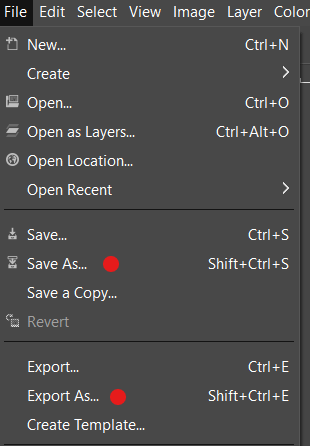
If you’re ready to start using your image, then click on ‘File’, then ‘Export As’ and choose where you would like to save the image. At the top of file explorer, you can change the name of the file by removing ‘Untiltied’ and typing in what you would like. Come down to the bottom and expand ‘Select File Type’ and here you can choose what type of file you would like it to be. Some of the popular extensions are PNG and JPEG.
Once you’re ready, click on ‘Export’. You will then get some settings pop up, you shouldn’t need to change these so then go and click on ‘Export’ again. You’re image will then be where you saved it.
However, if you want to come back later and edit the image more, then click on ‘File’ then click ‘Save As’ and a file explorer will appear and you can choose where you would like to save the file. Keep it as .cxf file because this is the file type GIMP uses.
Conclusion.
We have barely touched the surface on what can be done using GIMP, but we wanted to touch on the basics so you can explore more yourself.
Video:
Social Media: Linkedin, Twitter, Instagram
Read more about GuideRealm here.